Popular Posts
-
Problem: when trying to connect to terminal server windows 2008 R2 I would get this error message. Solution: Event ID 1069 — Remote D...
-
Problem: License server 192.168.1.254 is not available. This could be caused by network connectivity problems, the Remote Desktop Licensin...
-
Problem: The store C:\Users\monte\AppData\Local\Microsoft\Outlook\archive1.pst has detected a catalog checkpoint. Solution: Run the scanp...
-
Clearing the Java Plug-in cache forces the browser to load the latest versions of web pages and programs. To clear the Java Plug-in cache: ...
-
Problem: Can not download files in windows 2008 IE your current security settings does not allow this file to be downloaded Solutions: ...
-
Subject: How to use Ntdsutil commands in windows server 2008 Solution: check the following link http://www.tipsandtutorials.net/ntdsut...
-
Problem: Messaging interface has caused an unknown error Solution: The problem happen with outlook 2007 and exchange server, you should...
-
Subject: How to determin FSMO roles Holders Solution: Check the following link to the full solution http://www.petri.co.il/determining...
-
Setting up Exchange, also known as Microsoft Exchange, on the iPhone allows for the syncing of email, calendars and contacts to a computer s...
-
Problem: Dell poweradge 1800 not turning on after shuting down the server and moving it to new location the server is not starting, no lig...
Tuesday, December 6, 2011
Unable to Log in to Domain - The trust relationship between this workstation and the primary domain failed
Problem: Unable to Log in to Domain on Windows 7, Vista, and Server 2008 with an Error message showing "The trust relationship between this workstation and the primary domain failed"
Solution: Log on as a local administrator. Right click Computer icon, select Properties. Scroll down to Computer Name, domain, and Workgroup settings and click Change Settings. Where it says to rename this computer, Click change. Enter any Workgroup name, hit OK leaving the domain. Repeat the process and then Join the domain again.
This time restart the computer.
Now you should be able to log in to the domain again.
Thursday, November 17, 2011
How to reset the admin password on Symantec endpoint protection
Problem: Can't remember the admin password for Symantec endpoint protection
Solution: browes to the following folder C:\Program Files\Symantec\Symantec Endpoint Protection Manager\Tools
execute the following .bat file resetpass.bat it will reset the user name and password to admin
Solution: browes to the following folder C:\Program Files\Symantec\Symantec Endpoint Protection Manager\Tools
execute the following .bat file resetpass.bat it will reset the user name and password to admin
Wednesday, November 16, 2011
License server 192.168.1.254 is not available. This could be caused by network connectivity problems, the Remote Desktop Licensing service is stopped on the license server, or RD Licensing is no longer installed on the computer.
Problem:
License server 192.168.1.254 is not available. This could be caused by network connectivity problems, the Remote Desktop Licensing service is stopped on the license server, or RD Licensing is no longer installed on the computer.
Solutions:
Check that you have network connectivity between the Remote Desktop Session Host server and the license server. Also check that the RD Licensing service is started on the license server.
Tuesday, November 15, 2011
The RD Licensing grace period has expired and Licensing mode for the Remote Desktop Session Host server has not been configured. Licensing mode must be configured for continuous operation.
Problem:
when trying to connect to terminal server windows 2008 R2 I would get this error message.
Solution:
Applies To: Windows Server 2008 R2
.jpg) An RD Session Host server must be able to contact a Remote Desktop license server to request Remote Desktop Services client access licenses (RDS CALs) for users or computing devices that are connecting to the RD Session Host server. In addition, the Remote Desktop licensing mode configured on an RD Session Host server must match the type of RDS CALs available on the license server.
An RD Session Host server must be able to contact a Remote Desktop license server to request Remote Desktop Services client access licenses (RDS CALs) for users or computing devices that are connecting to the RD Session Host server. In addition, the Remote Desktop licensing mode configured on an RD Session Host server must match the type of RDS CALs available on the license server.
The Remote Desktop licensing mode determines the type of Remote Desktop Services client access licenses (RDS CALs) that an RD Session Host server will request from a license server on behalf of a client connecting to the RD Session Host server. Although there is a licensing grace period during which no license server is required, after the grace period ends, clients must receive a valid RDS CAL issued by a license server before they can log on to an RD Session Host server.
Important: The Remote Desktop licensing mode configured on an RD Session Host server must match the type of RDS CALs available on the license server.
To perform this procedure, you must have membership in the local Administrators group, or you must have been delegated the appropriate authority.
To specify the Remote Desktop licensing mode:
To perform this procedure, you must have membership in the local Administrators group, or you must have been delegated the appropriate authority.
To use Licensing Diagnosis in Remote Desktop Session Host Configuration:
when trying to connect to terminal server windows 2008 R2 I would get this error message.
Solution:
Event ID 1069 — Remote Desktop Services Client Access License (RDS CAL) Availability
Published: January 8, 2010Applies To: Windows Server 2008 R2
.jpg) An RD Session Host server must be able to contact a Remote Desktop license server to request Remote Desktop Services client access licenses (RDS CALs) for users or computing devices that are connecting to the RD Session Host server. In addition, the Remote Desktop licensing mode configured on an RD Session Host server must match the type of RDS CALs available on the license server.
An RD Session Host server must be able to contact a Remote Desktop license server to request Remote Desktop Services client access licenses (RDS CALs) for users or computing devices that are connecting to the RD Session Host server. In addition, the Remote Desktop licensing mode configured on an RD Session Host server must match the type of RDS CALs available on the license server.Event Details
| Product: | Windows Operating System |
| ID: | 1069 |
| Source: | Microsoft-Windows-TerminalServices-RemoteConnectionManager |
| Version: | 6.1 |
| Symbolic Name: | EVENT_LICENSING_MODE_NOT_CONFIGURED_PAST_GRACE_PERIOD |
| Message: | The RD Licensing grace period has expired and Licensing mode for the Remote Desktop Session Host server has not been configured. Licensing mode must be configured for continuous operation. |
Resolve
Specify the licensing mode for the Remote Desktop Session Host server
To resolve this issue, specify the Remote Desktop licensing mode on the RD Session Host server.The Remote Desktop licensing mode determines the type of Remote Desktop Services client access licenses (RDS CALs) that an RD Session Host server will request from a license server on behalf of a client connecting to the RD Session Host server. Although there is a licensing grace period during which no license server is required, after the grace period ends, clients must receive a valid RDS CAL issued by a license server before they can log on to an RD Session Host server.
Important: The Remote Desktop licensing mode configured on an RD Session Host server must match the type of RDS CALs available on the license server.
To perform this procedure, you must have membership in the local Administrators group, or you must have been delegated the appropriate authority.
To specify the Remote Desktop licensing mode:
- On the RD Session Host server, open Remote Desktop Session Host Configuration. To open Remote Desktop Session Host Confiiguration, click Start, point to Administrative Tools, point to Remote Desktop Services, and then click Remote Desktop Session Host Configuration.
- If the User Account Control dialog box appears, confirm that the action it displays is what you want, and then click Yes.
- Under Licensing, double-click Remote Desktop licensing mode.
- Select either Per Device or Per User, depending on your environment.
- Click OK.
- To specify the Remote Desktop licensing mode for an RD Session Host server by using Group Policy, enable the Set the Remote Desktop licensing mode Group Policy setting. This Group Policy setting is located in Computer Configuration\Administrative Templates\Windows Components\Remote Desktop Services\Remote Desktop Session Host\Licensing. Note that the Group Policy setting will take precedence over the setting configured in Remote Desktop Session Host Configuration.
- To configure the Group Policy setting in Active Directory Domain Services (AD DS), use the Group Policy Management Console (GPMC). To configure the Group Policy setting locally on an RD Session Host server, use the Local Group Policy Editor. For more information about configuring Group Policy settings, see either the Local Group Policy Editor Help (http://go.microsoft.com/fwlink/?LinkId=143317) or the GPMC Help (http://go.microsoft.com/fwlink/?LinkId=143867) in the Windows Server 2008 R2 Technical Library.
Verify
To verify that the RD Session Host server can contact a Remote Desktop license server with the appropriate type of Remote Desktop Services client access licenses (RDS CALs), use Licensing Diagnosis in Remote Desktop Session Host Configuration.To perform this procedure, you must have membership in the local Administrators group, or you must have been delegated the appropriate authority.
To use Licensing Diagnosis in Remote Desktop Session Host Configuration:
- On the RD Session Host server, open Remote Desktop Session Host Configuration. To open Remote Desktop Session Host Configuration, click Start, point to Administrative Tools, point to Remote Desktop Services, and then click Remote Desktop Session Host Configuration.
- If the User Account Control dialog box appears, confirm that the action it displays is what you want, and then click Yes.
- In the left pane, click Licensing Diagnosis.
- Under Remote Desktop Session Host Server Configuration Details, the value for Number of RDS CALs available for clients should be greater than 0.
Messaging interface has caused an unknown error
Problem: Messaging interface has caused an unknown error
Solution:
The problem happen with outlook 2007 and exchange server, you should update to sp2 for office 2007, but the solution is to repair the pst files, the pst files above 2 GB will have problem, you will need to run the scanpst.exe for all the files that are above 2GB.
for more compilcated explenation check the following link
http://support.microsoft.com/kb/814441
Thursday, November 10, 2011
How to Set Up Exchange on an iPhone
Setting up Exchange, also known as Microsoft Exchange, on the iPhone allows for the syncing of email, calendars and contacts to a computer server. Setting up multiple exchange accounts on the iPhone requires that a device is running version iOS 4 or later. The iPhone will only sync with computer servers running either Microsoft Exchange 2003 with Service Pack 2 installed or Microsoft Exchange 2007 with Service Pack 1 installed.
- Difficulty:
- Moderate
Instructions
- 1 Tap on the "Settings" app. If you are unable to locate the "Settings" app, tap on the physical "Home" button once, then wait two seconds and tap on the "Home" button again. In the "Search" field, type in "Settings," and tap on the app.
- 2 Tap on the "Mail, Contacts, Calendars" menu option, then tap upon "Add Account" underneath the "Accounts" section.
- 3 Tap on the "Microsoft Exchange" menu option.
- 4 Type in your exchange email address in the "Email" field, then type in your "Username" and "Password" in the respective fields. Next, type in a name for the account in the "Description" field, which will identify your Exchange account on the iPhone. Tap on the blue "Next" button which will verify login account details.
- 5 Type in your exchange server's domain in the "Server" field, then tap on the blue "Next" button.
- 6 Verify that the blue "On" buttons are switched next to the "Mail," "Contacts" and "Calendars" fields. If you see a grey "Off" next to any of these fields, tap upon each grey button to have the iPhone sync email, contacts and calender to the exchange server.
- 7 Tap on the blue "Save" button to finish setting up Microsoft Exchange on the iPhone.
- 1
How to Set Up Exchange on an iPhone
Setup Instructions
Before you start:
* We strongly recommend that you back up any data from your phone using the Nokia PC Suite or other phone management software.
* You'll also need to make sure that your phone is compatible with Mail for Exchange and that you've downloaded the latest version. To configure the Mail for Exchange application for Google Sync, follow these steps:
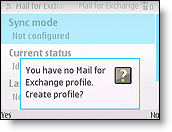
- Open the MfE folder on your phone and start the Mail for Exchange application.
- Select Yes when prompted to create a new Sync profile.
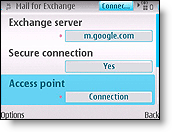
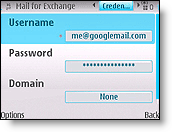
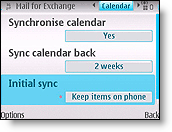
- Configure the profile with the following settings:

* Connection
- Exchange Server: m.google.com
- Secure Connection: Yes
- Access Point: your carrier's Internet access point
- Sync while roaming: your preferred setting
- Use default port: Yes

* Credentials
- Username: Your full Google email address, e.g. jon@gmail.com
- Password: Your Google Account password. (If you're a 2-step verification user, please use an application-specific password instead.)
- Domain: leave empty
- Decide when you want synchronization to happen. Leaving this Always On will ensure your data is always current, but will also consume more battery than other settings.

* Calendar
- Synchronize Calendar: Enable or disable
- Sync Calendar back: your preference
- Initial Sync: Decide if you want to keep existing Calendar events on your phone or replace them all with events synced from Google Calendar.
- Synchronize Tasks: No (currently not supported by Google Sync)
- Synchronize Contacts: Enable or Disable
- Initial Sync: Decide if you want to keep existing Contacts on your phone or replace them all with contacts synced from Google.
- Synchronize Email: Enable or Disable
- E-mail address (default based on profile)
- Show new mail popup (yes/no)
- Use signature (default to no)
- Signature
- When sending mail (default: send immediately; alternative is send at next sync only)
- Sync messages back (default: 3 days; alternatives are 1 day, 1 week, 2 weeks, 1 month, all messages)

Tuesday, November 8, 2011
Outlook.pst can not be accessed - 0x80040116" error message when you start Outlook 2000 or open a personal folder file
Problem: Outlook.pst can not be accessed - 0x80040116" error message when you start Outlook 2000 or open a personal folder file Outook 2003/2000
Solution:
Check the following KB http://support.microsoft.com/kb/329910
Solution:
Check the following KB http://support.microsoft.com/kb/329910
The store C:\Users\monte\AppData\Local\Microsoft\Outlook\archive1.pst has detected a catalog checkpoint.
Problem: The store C:\Users\monte\AppData\Local\Microsoft\Outlook\archive1.pst has detected a catalog checkpoint.
Solution:
Run the scanpst.exe on the outlook file and the archive files that open with outlook, some errors will be found, also check the size of the pst file and the archive files.
Solution:
Run the scanpst.exe on the outlook file and the archive files that open with outlook, some errors will be found, also check the size of the pst file and the archive files.
Monday, November 7, 2011
Dell poweradge 1800 not booting
Problem: Dell poweradge 1800 not turning on
after shuting down the server and moving it to new location the server is not starting, no lights on the motherboard or power supply.
Solution: Dead Power supply, for dell parts you can call citytechsolutions.com at 1-888-784-2088, part number c4797
after shuting down the server and moving it to new location the server is not starting, no lights on the motherboard or power supply.
Solution: Dead Power supply, for dell parts you can call citytechsolutions.com at 1-888-784-2088, part number c4797
Friday, October 21, 2011
How to use Ntdsutil commands in windows server 2008
Subject: How to use Ntdsutil commands in windows server 2008
Solution:
check the following link
http://www.tipsandtutorials.net/ntdsutil-commands-in-windows-server-2008.html
Solution:
check the following link
http://www.tipsandtutorials.net/ntdsutil-commands-in-windows-server-2008.html
Shur-Net Solutions
you can find us on the net @ http://shur-netsolutions.net/
714-206-6118
Your use of the services is at your sole risk. The services and are provided on an "as is" and "as available" basis. Unless otherwise explicitly stated, the materials on the Website are provided "as is,"
How to use the Ntdsutil command to transfer roles
Transferring the RID Master, PDC Emulator, and Infrastructure Masters via GUI
To Transfer the Domain-Specific RID Master, PDC Emulator, and Infrastructure Master FSMO Roles:
To Transfer the Domain Naming Master Role:
To transfer the FSMO roles from the Ntdsutil command:
Caution: Using the Ntdsutil utility incorrectly may result in partial or complete loss of Active Directory functionality.
Options are:
More information
http://support.microsoft.com/kb/255504
To Transfer the Domain-Specific RID Master, PDC Emulator, and Infrastructure Master FSMO Roles:
- Open the Active Directory Users and Computers snap-in from the Administrative Tools folder.
- If you are NOT logged onto the target domain controller, in the snap-in, right-click the icon next to Active Directory Users and Computers and press Connect to Domain Controller.
- Select the domain controller that will be the new role holder, the target, and press OK.
- Right-click the Active Directory Users and Computers icon again and press Operation Masters.
- Select the appropriate tab for the role you wish to transfer and press the Change button.
- Press OK to confirm the change.
- Press OK all the way out.
To Transfer the Domain Naming Master Role:
- Open the Active Directory Domains and Trusts snap-in from the Administrative Tools folder.
- If you are NOT logged onto the target domain controller, in the snap-in, right-click the icon next to Active Directory Domains and Trusts and press Connect to Domain Controller.
- Select the domain controller that will be the new role holder and press OK.
- Right-click the Active Directory Domains and Trusts icon again and press Operation Masters.
- Press the Change button.
- Press OK to confirm the change.
- Press OK all the way out.
- Register the Schmmgmt.dll library by pressing Start > RUN and typing:
regsvr32 schmmgmt.dll
- Press OK. You should receive a success confirmation.
- From the Run command open an MMC Console by typing MMC.
- On the Console menu, press Add/Remove Snap-in.
- Press Add. Select Active Directory Schema.
- Press Add and press Close. Press OK.
- If you are NOT logged onto the target domain controller, in the snap-in, right-click the Active Directory Schema icon in the Console Root and press Change Domain Controller.
- Press Specify .... and type the name of the new role holder. Press OK.
- Right-click right-click the Active Directory Schema icon again and press Operation Masters.
- Press the Change button.
- Press OK all the way out.
To transfer the FSMO roles from the Ntdsutil command:
Caution: Using the Ntdsutil utility incorrectly may result in partial or complete loss of Active Directory functionality.
- On any domain controller, click Start, click Run, type Ntdsutil in the Open box, and then click OK.
Microsoft Windows [Version 5.2.3790]
(C) Copyright 1985-2003 Microsoft Corp.

C:\WINDOWS>ntdsutil
ntdsutil:
- Type roles, and then press ENTER.
ntdsutil: roles
fsmo maintenance:
Note: To see a list of available commands at any of the prompts in the Ntdsutil tool, type ?, and then press ENTER.
- Type connections, and then press ENTER.
fsmo maintenance: connections
server connections:
- Type connect to server <servername>, where <servername> is the name of the server you want to use, and then press ENTER.
server connections: connect to server server100
Binding to server100 ...
Connected to server100 using credentials of locally logged on user.
server connections:
- At the server connections: prompt, type q, and then press ENTER again.
server connections: q
fsmo maintenance:
- Type transfer <role>. where <role> is the role you want to transfer.
Options are:
Transfer domain naming master
Transfer infrastructure master
Transfer PDC
Transfer RID master
Transfer schema master
- You will receive a warning window asking if you want to perform the transfer. Click on Yes.
- After you transfer the roles, type q and press ENTER until you quit Ntdsutil.exe.
- Restart the server and make sure you update your backup.
More information
http://support.microsoft.com/kb/255504
Shur-Net Solutions
you can find us on the net @ http://shur-netsolutions.net/
714-206-6118
Your use of the services is at your sole risk. The services and are provided on an "as is" and "as available" basis. Unless otherwise explicitly stated, the materials on the Website are provided "as is,"
Determining FSMO Role Holders
Subject: How to determin FSMO roles Holders
Solution:
Check the following link to the full solution
http://www.petri.co.il/determining_fsmo_role_holders.htm
How to view and transfer FSMO roles in Windows Server 2003
check the following KB http://support.microsoft.com/kb/324801
Solution:
Check the following link to the full solution
http://www.petri.co.il/determining_fsmo_role_holders.htm
How to view and transfer FSMO roles in Windows Server 2003
check the following KB http://support.microsoft.com/kb/324801
Shur-Net Solutions
you can find us on the net @ http://shur-netsolutions.net/
714-206-6118
Your use of the services is at your sole risk. The services and are provided on an "as is" and "as available" basis. Unless otherwise explicitly stated, the materials on the Website are provided "as is,"
Monday, October 10, 2011
How to create batch file to copy data from one hard drive to another
Subject: need to copy acronis.tib file from one hard drive to another with Scheduling
Solution:
create a batch file with the following syntex depend on your drive letters.
@ echo
del f:\backup\*.* /Q ----- this line will eraes all previus files
copy g:\backup.tib f:\backup ----- this line will copy the acronis file from the g drive to the f drive backup folder
Schedule the batch file to run after the backup was created
Shur-Net Solutions
you can find us on the net @ http://shur-netsolutions.net/
Your use of the services is at your sole risk. The services and are provided on an "as is" and "as available" basis. Unless otherwise explicitly stated, the materials on the Website are provided "as is,"
Subscribe to:
Posts (Atom)

